
A few months ago, I starting taking part in design challenges hosted by the Art Elements Blog. See the Design Challenge label for the posts. I force myself out of my comfort zone with each challenge and although I'm laying out some extra bucks and time, I look forward every month to discovering what new theme is announced AND expanding my artistic repertoire.
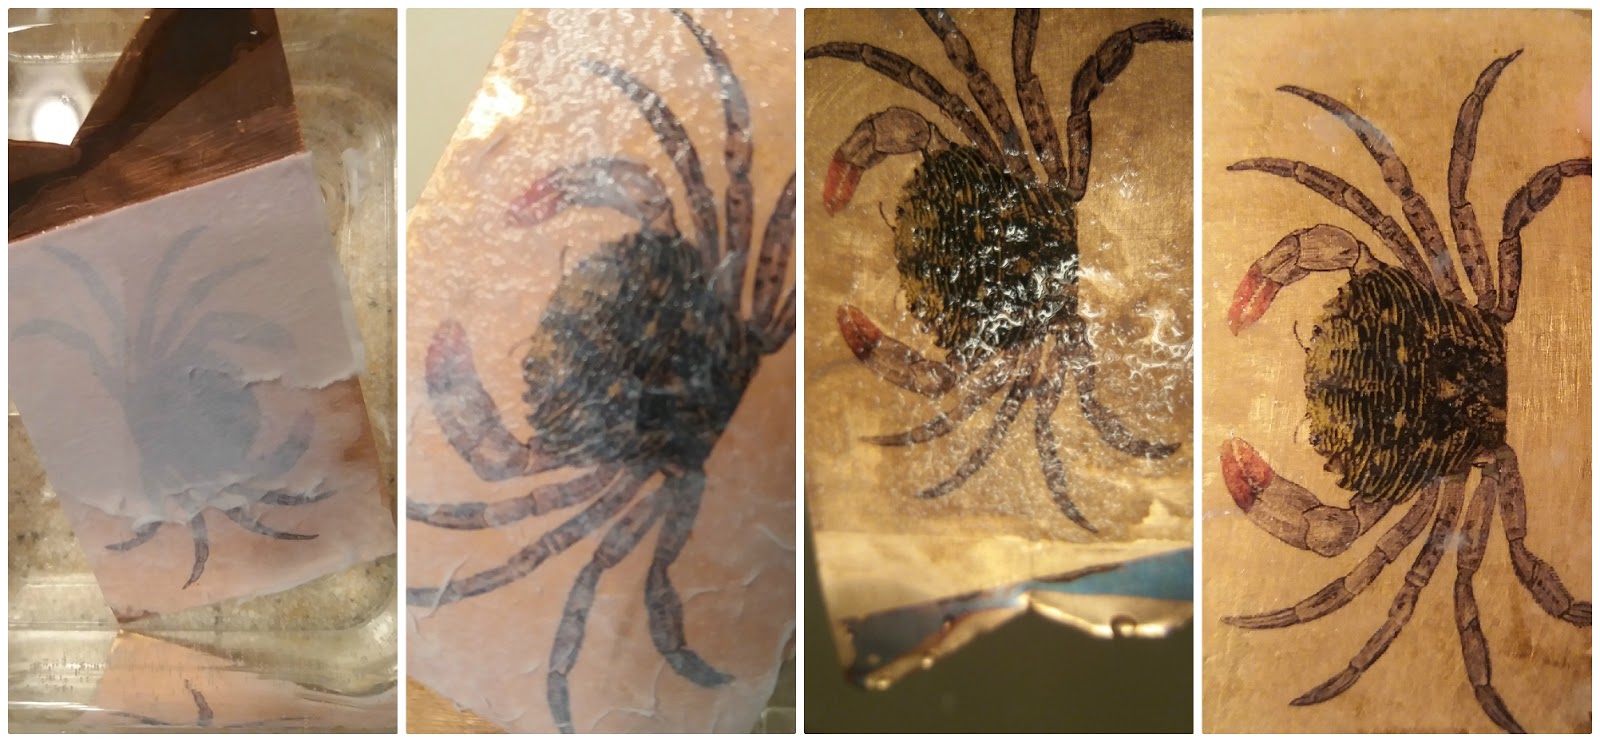
May's topic was Tide Pools. I had the great idea of transferring a color photo to some copper sheet. I did my 'research' and followed a You Tube video by the Crafsman. (Warning: You'll probably get a lead-in ad). Very thorough and concise. All I needed was a laser printer, metal of choice, some polyacrylic sealer, an iron and my two hands!! So I finally located the printer at the UPS store (no, I didn't buy a printer, I do have limits as to how much moola I will spend on supplies) and had a couple of pages printed with several images. I thought I'd kill two birds with one stone and prepared some black and white images for etching in a couple weeks time.

I was happy as a crab err ... clam to see that the color and all the detail came out just the way it should! So the guy says if there's still paper left after the initial rub, just rub some more under water and it should all go away. Looks good wet doesn't it? (4th pic) My heart was a-fluttering!!
Then it dried! I wasn't happy with the paper still on some of the image and I wasn't happy with the copper around the image that had some polyacrylic and just looked messy. So I just decided to go for broke and rubbed fiercely with my nails (see the marks?). No banana!
I came back to it a day or two later hoping that all that paper would somehow be easy enough to repeat above procedure. NOT! So then I was sufficiently exasperateds and took a blue kitchen sponge to it and that removed most of the print. I thought I had a pic of that, but don't.
After sulking for a few hours, I researched again to get some possible answers as to why, why why, since I followed all the directions.
It appears that you need a LOT of toner set down on your print/photocopy and when I had asked the gal if she could adjust the darkness, she said she wasn't sure how 😑. Also, apparently some toner is now 'Eco', whatever that means, but they allude to it being a smidge different from the good ole' stuff.
May's topic was Tide Pools. I had the great idea of transferring a color photo to some copper sheet. I did my 'research' and followed a You Tube video by the Crafsman. (Warning: You'll probably get a lead-in ad). Very thorough and concise. All I needed was a laser printer, metal of choice, some polyacrylic sealer, an iron and my two hands!! So I finally located the printer at the UPS store (no, I didn't buy a printer, I do have limits as to how much moola I will spend on supplies) and had a couple of pages printed with several images. I thought I'd kill two birds with one stone and prepared some black and white images for etching in a couple weeks time.
Then it dried! I wasn't happy with the paper still on some of the image and I wasn't happy with the copper around the image that had some polyacrylic and just looked messy. So I just decided to go for broke and rubbed fiercely with my nails (see the marks?). No banana!
I came back to it a day or two later hoping that all that paper would somehow be easy enough to repeat above procedure. NOT! So then I was sufficiently exasperateds and took a blue kitchen sponge to it and that removed most of the print. I thought I had a pic of that, but don't.
| After second gentle rubbing and not so gentle fingernail scraping! |
It appears that you need a LOT of toner set down on your print/photocopy and when I had asked the gal if she could adjust the darkness, she said she wasn't sure how 😑. Also, apparently some toner is now 'Eco', whatever that means, but they allude to it being a smidge different from the good ole' stuff.
So I'm going with those two excuses reasons 😉. I may try again one day using a printer where I can manually adjust the darkness ... since I'm an eternal optimist (most of the time).
I obviously couldn't get this piece ready for the Big Reveal, so I eventually just removed the whole print with some acetone and recycled it for my NEXT experiment ... Etching!!
That will be Part 2 of Image Transfer & Etching Experiments on Copper. Coming Up Soon!
Comments
Post a Comment